
Liquid error: Memory limits exceeded
Oh, Christmas Tree!
Nov 10, 2021
Hey, guys!
Happy holidays to all. Today's tutorial is more of an advanced one.
There will be tons of stock image adjustments, so that we will use stock image websites like Pixel squid and Deposit photo. Now, I did complete the same composite last year, so I will be flipping back and forth using it as a guide. Of course, you can always check out my previous tutorial and many more with a premium membership.
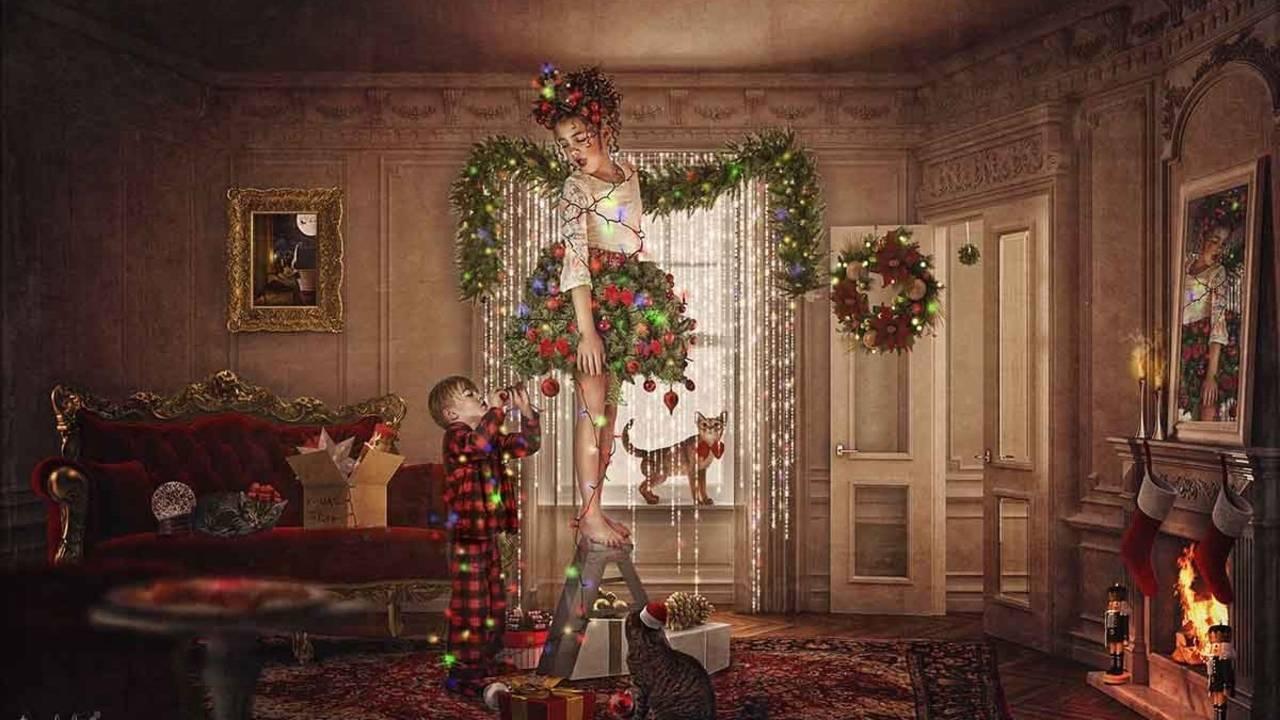
We're starting with a base image with an empty room. I have already prepared in advance, so I have images masked & cut out. We start by adding our cut layer; I prepped a little girl with her cat and little brother.

To set the warm holiday setting, we add our cut out of a flame and change its perspective to get things toasty! We continue with a rug, a couch, a table, and a tiny gingerbread man.
Most of my images are from pixel squid, which I love; it saves me time. Also, it's much easier than finding the right-angled stock image.
A neat little touch that I'm going to add is the rustic frame with the picture of the little girl feeding a moose. This detail helps tie the composite together, although it is tricky to pull off. I go ahead and drag my frame and fix its perspective.
Then I copy my image and resize it to make sure it fits behind the frame. There might be excess coming out on the side of the frame. But that's an easy fix; we apply the mask and brush it away.
I understand steps like this can become confusing, so if you need extra help, you can always access tons of tutorials and advice with a premium subscription.

A necessary step would be to add some nutcrackers on the sides of the fireplace; we rotate the perspective and repeat to place one on the other side.
The little girl in the room is our centerpiece, so we need to adorn her with all the correct Christmas props. Like before, we use our ornaments from pixel squid. I added Christmas bulbs, presents, bows, and a cute kitty cat.
Just be careful with the shadows these images come with. You can always turn them off from the pixel squid extension setting. This stuff is a little receptive to feel to add as many seasonal props as you'd like!
Now, let's pull up our adorable white cat from our Adobe stock. He's a little tricky to cut out, so I use the crop tool, but you guys are free to use any method you find convenient.
To add a realistic texture to fur, I use the soft tool and copy and save it as a "PSD" file. Then, I add the layer to our primary composite with a quick little resize. Now the napping cat can fit nice and snug on our red couch.

I used many trinkets to adorn the atmosphere, so I'm pulling up the snow globe pixel squid.
At this point, I have tallied many layers, and it can be overwhelming. So, to keep things tidy, I go ahead and group layers that should be grouped, like the fireplace and the flame, the table, its ornaments, etc. Of course, to view a complete list for inspiration and ideas, you can always consider some of my other videos with a premium subscription, and It goes a long way!
Before we begin fixing the details like shadows and tones, I add a special touch of realism. To give our little girl a reflection in the mirror, I copy her and flip her horizontally. I lower the opacity and white brush off her extra pieces, so she fits in the mirror perfectly. I'm working on the details, but I understand it takes time.
I suggest you guys work into something like this when you have the time to sit around and have fun! On the cardboard board box, I go ahead and insert a nutcracker. I make sure to tilt him and resize him so he fits in. While we're working on him, why not give him some unique Christmas trinkets?! I resize both a candy cane and elf hat to keep him company.
What yells out the holiday season more than Christmas bulbs?! I think laying some on the red carpet will give the composite a better look. But I only downloaded red &silver ones so that they won't stand out.
That's an easy fix. We pull up our image, click on colorize, and play around with the saturation. It runs out our green doesn't look very pretty. I'll settle for the silver bulb because it looks better, but now you can easily change the bulb color!

Before we start on the Christmas lights, which happens to be one of the most challenging parts, I will start adding some solid overlay colors to the fireplace. I inverted the solid color and duplicated it just in case we needed it.
We see a warm orange glow you would expect from a toasty living room fire. I add a little dodge on the floor next to the fireplace to make it look more realistic, group everything, and apply a group blend to ensure consistent colors.

Now approaching the last steps of our tutorial, we have some of the most complex tasks left to complete. First, I give the atmosphere some vignette, Christmas lights, and overall color balance. Here is where you will need to follow along with the full-length tutorial.
To help save you time skipping right to the fun stuff, I have now created the Nostalgic Christmas Background Collection that includes this background!
Find it here>> TLE BACKGROUND COLLECTIONS

Happy Editing and Happy Holidays,
Tara Lesher xo
Subscribe to our newsletter

Follow us on your favorite socials
Explore
Connect
@2024 TARA LESHER | All Rights Reserved