
DIY Ring Light
Nov 15, 2025Grab some scissors and a cardboard box, y’all. You're about to save yourself a ton of money for a bit of sweat equity.
I'm a very passionate hobbyist in photography. But unfortunately, passion doesn't cut me a check for my equipment, so DIY hacks are often necessary. Today, I will show you how to make your ring light for about $30. It won't be fancy, it won't have bells and whistles, but it will add a pretty little ring around your pupils in photos—and that’s the goal.

To get started, you’ll need the following tools:
-Tinfoil (regular or heavy-duty)
-20-inch wire wreath frame. Michael’s carries these for $2-$3.
-20-foot LED rope light. You can find these on Amazon for $25-$29.
-Thick cardboard box
-Box cutter or scissors
Michael’s was out of 20-inch wire wreath frames when I went there, so I had to choose between an 18-inch or a 24-inch wreath. The larger and brighter the ring, the more wiggle room you’ll have with distance, but you’ll need a longer rope light. I went with the 18" because I thought the 24" would be overkill.
The light is a 20-foot LED rope light. It's waterproof & built for outdoor use, so this thing is super rugged. Unfortunately, this particular rope light lies flat and doesn't coil on a circular axis, so you'll have to face it to the wreath frame's inside (or the outside) to get the correct shape. However, it has a 180-degree reach, so it'll work fine.
If you can find an LED light constructed in a bright enough tube, feel free to try it. I went with this because it was 5200 lumens, and I wanted a BLAM IN YOUR FACE light. That, and I didn't bother shopping around.

Start by drawing out the inside and outside diameter of the frame. Be generous and make the circle slightly larger than the actual size. Now grab that box cutter and cut the circle out. It would help if you ended up with a cardboard steering wheel.
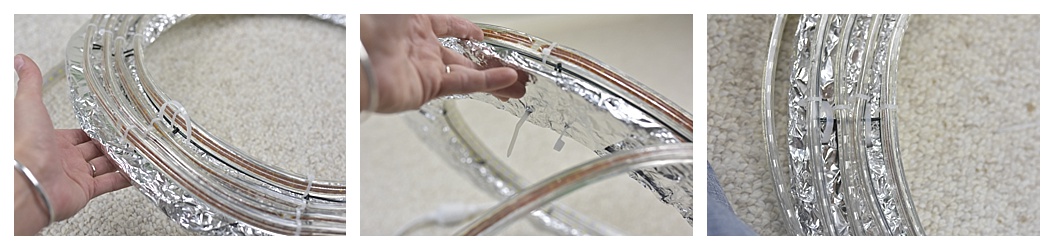
Next, zip-tie the end piece of the light (the end without the plug) to the inner ring of the wireframe. Follow along the ring and zip-tie at each anchor point. By the time you make the first loop, it should look like the photo below, be completely solid and stable enough to pick up by the light without moving out of place or flexing. Continue this pattern until you’ve wrapped the entire frame. (Figure 3)
Once you complete the ring, add a zip tie at the very end for security. (Figure 4)

Back to the cardboard steering wheel: tear off large pieces of foil and begin wrapping it. Make sure the foil pieces are large enough to wrap the cardboard a couple of times, since foil isn’t exactly the most robust material. Wrap the entire wheel. (Figure 5)
Next, you’re going to align your light frame on the cardboard and drill pilot holes for a few more zip ties. I found that using one sheet from a pair of scissors makes perfect pilot-hole slits. (Figure 6)

Loop the zip tie through the pilot holes and ensure the nub is at the back. I placed two zips at every other cross-brace of the frame. You could zip-tie everything together at once instead of making them two separate pieces. But cardboard and foil aren’t exactly designed for longevity. In the unlikely event that the foil piece wears down, all you’ll have to do in the future is snip those anchor points & cut a new, shiny steering wheel. (Figure 7) (Figure 8) (Figure 9)
Voila! By now, you should have a fully-functional, DIY ring light. Now wasn’t that easy?! It’s light enough to clip to or hang from almost anything, or if you want to go the extra mile, try this: cut a foil square off the back of the new light.

I grabbed some industrial-strength Velcro strips from Home Depot for a little over $2 and placed a fitted strip directly on the cardboard where the foil had been removed. I put several more pieces of Velcro on various tripods around my studio. Do you know those crappy little “table mount” tripods that vendors give away in bundles? We all know they don’t support a DSLR camera! Throw a strip of Velcro on one of those, and you’ll have a handheld ring light at your disposal.
Isn’t she pretty?! Sorry for the choppy background; my backdrops wouldn’t roll up, and my chair was missing from my studio. Try not to go cross-eyed.

This thing is so much fun and so easy to make.

At this point, we know that it resembles a ring light, but does it work?
Drum roll, please...

EXCUSE ME WHILE I BREAK INTO MY HAPPY DANCE! And strike a pose. AND jump for joy over the amount of money I just saved!

A few extra tips and pointers–
The remaining tail of the light becomes part of the cord/plug. I wrapped mine with black electrical tape. It’s not very long, but this isn’t exactly what these lights are designed for. However, I use extension cords in my studio, so it’s not a problem. Use your imagination to make it work for you!
A light diffuser can be made to fit around the ring if you so desire. Try wax paper, or grab an old sheer nighty, cut it up to size, and throw an elastic strip around it. You can make so many tweaks to customize this light to your liking—you have to tap into your creativity. It’s there. I promise.
Good luck!
Written by: Emily Yasuda
Lorem ipsum dolor sit amet, consectetur adipiscing elit. Cras sed sapien quam. Sed dapibus est id enim facilisis, at posuere turpis adipiscing. Quisque sit amet dui dui.
Stay connected with news and updates!
Join our mailing list to receive the latest news and updates from our team.
Don't worry, your information will not be shared.
We hate SPAM. We will never sell your information, for any reason.
