
Liquid error: Memory limits exceeded
The Puppet Master
Apr 16, 2022
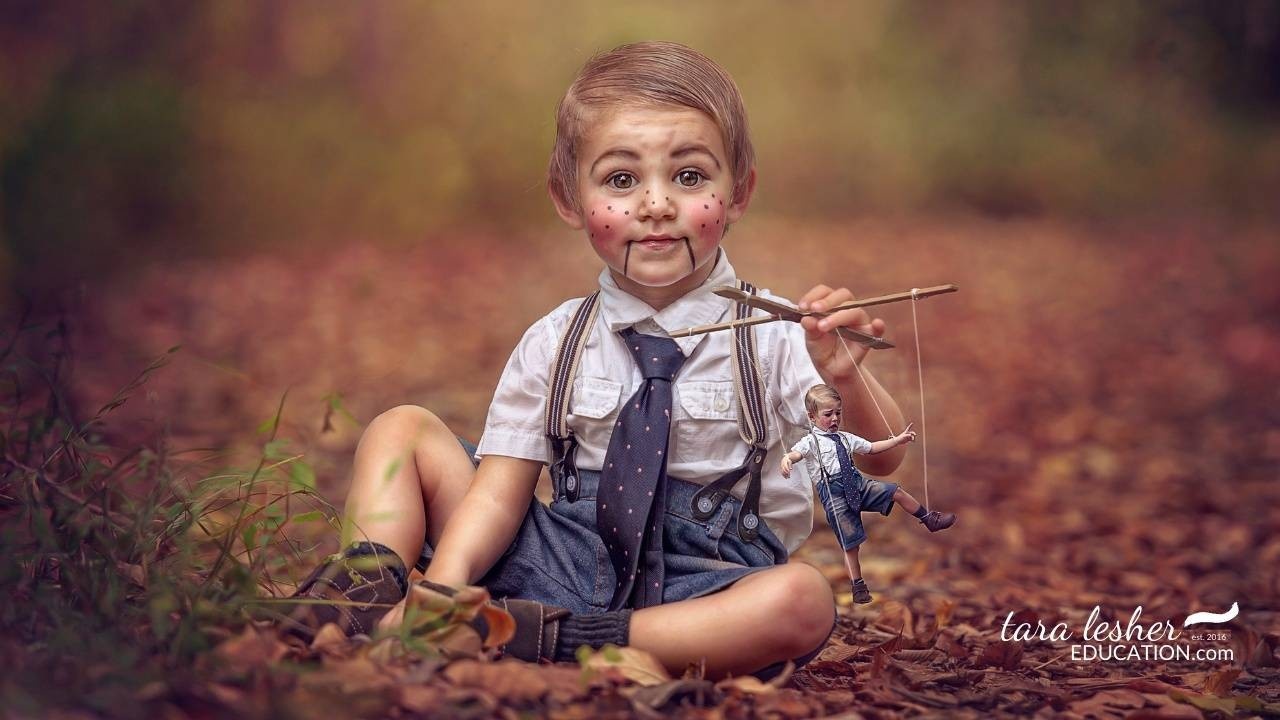
Hello guys, today's tutorial is a super fun throwback to one of my older images.
We're going to make it look like our little boy controls his marionette.

So the first thing I do is go in and get rid of the stick he's holding using the spot healing brush tool. We will be bringing in our rod, or "controller," for our little marionette insert so that we won't need the original stick. So the next thing I do is go in and remove that pesky vine poking out toward our subject.
After we have our image cleaned up, we will go into our camera RAW filter and sharpen our image. After that, we will play around with our color tones and luminance, finishing off with our vignetting. You can access the complete tutorial and many more like it through my premium membership to see exactly how I edited this image.
From there, I cut out our little "puppet" from another image I took and figured out the hard way that I should have brought him farther away from the background to make it easier when it came time to cut him out. I also cut out our "controller" from the same image and tweaked it back on our central idea.

Now is the tricky part, playing around with the portions that should be masked and which show. After setting up my controller, I grab my little puppet and bring him over to our main image to set him up and paint on his strings. Again, you can opt-in for my premium membership to see how I do this in my full tutorial.
Now we get to go in and adjust the brightness and contrast of our little puppet so that he looks more fitting for our final image. Then we duplicate the appearance and play with its curves to turn it into a shadow for our puppet.
I add a curves layer to bring down the brightness of our background and parts of our subject. Then, we mask the layer and brush it on where we want to see it. We can then add in our background, blending and masking it to warm up our image without oversaturating.

Now it's time to focus on the extra details using our dodge and burn tool to create contrast and highlight the elements we want to pop. Finally, I finished with a film stock that gave me the tone and brightness I wanted, making sure to mask the areas I didn't want to be impacted.
That wraps up our tutorial, and I hope you enjoyed it! Check out the full tutorial with my premium membership if you want a walk-through of all the steps to get to our final image.

If you are a beginner and wonder if the premium membership is suitable for you, I invite you to follow the free tutorials. It is a lot of fun and designed for beginner to advanced users. taralesher.com/free-how-to-tutorials
Happy Editing!
Tara xo
Subscribe to our newsletter

Follow us on your favorite socials
Explore
Connect
@2024 TARA LESHER | All Rights Reserved